
Taken from the now defunct www.build-quality.co.uk website, originally written by me (James Copp-Taylor), back in 2000!
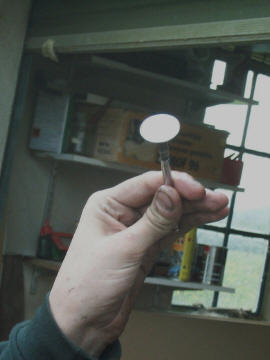
To be honest, this was not something I was expecting to have to do, until I overhauled the turbo, but fate it seems, isn’t without a hint of irony. The car in question is a 1990 Rover 820i Mk1B, here it is shown (not repaired) but cleaned and polished by it’s current owner whilst I was working hard on the head. The reason for this headjob was quite simply cambelt related. Alex was driving along when he lost all power, he tried to restart the vehicle but received a compression less whine. I examined the car before towing it home and pronounced the cambelt as snapped. Starting the vehicle was not a good idea as it had bent all sixteen of the valves, a very nasty little occurance that could cause some grief later. We got the vehicle home and I noticed a lot of oil leaking from the cam end oil seals, basically that had become non sealing, oil had got onto the belt and behind the tensioner, the tensioner had slipped, the belt had become weakened and snapped causing valves to meet with piston crowns, very nasty.

My first task was to dismantle the top end, here are the steps I took. DRAIN COOLING SYSTEM FIRST BY DISCONNECTING BOTTOM HOSE ON RAD!! (I forgot, more on that later)
1 – Disconnect battery negative lead: 13 mm nut
2 – Remove cam covers and plenum chamber: 8mm bolts
3 – Remove exhaust manifold: 15 and 17 mm bolts
4 – Remove the head bolts: 10x 15mm bolts, use a breaker bar as they can be quite stiff, Alex’s weren’t that stiff however.
5 – With the head bolts loosened u and the plenum chamber removed disconnect the injection loom from the Coolant sensors on thermostat housing, the three big engine multiplugs, the knock sensor and the engine ECU, oil pressure switch and starter motor and move the loom out the way
6 – Lift off the head, and make the mistake of filling the bores with water
This gets the head off, my water issue was easily solved. Using an old fuel pump, some hose and a 12V supply, I was able to pump the bores dry, a bit of tissue to dry the remaining moisture was employed. I proceeded to fill the bores with engine oil to stop them rusting, vaseline will work also, but I prefer to use oil as it gives greater protection against rust.
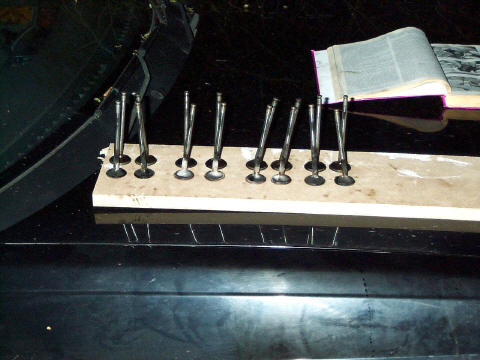
The next task is to start the head strip down, I numbered some wine glasses from 1 – 16 ready to receive the tappets, valve springs and collets, to remove the valves I had to purchase a universal valve compressor at 42 quid, a lot of cash but a good bit of kit that is proving very useful. I drew a picture of the head, with inlet sides and outlet sides marked and numbered the valves 1 to 16, I then labeled the wine glasses as such and placed the tappets, collets and springs into each numbered glass in turn. Each valve that was removed was examined for bentness, well, everyone was bent so I took a photo of said valves and kept them for interest sakes. The head now stripped down, it was ready to go to the engineering shop to be skimmed, this cost a reasonable £22 and the head came back with new locating dowels fitted with a smooth, gleaming face, looking nice and new.

| With new valves salvaged from another head, the task of putting the skimmed head back together has begun, and is in process as I write this. I took each valve in turn and commenced the following process for cleaning the valve. I placed the valve in a drill and held some wire wool over the valve whilst rotating the drill, this caused a lot of the deposits to shift, stubborn deposits were removed with a wire brush circular drill tool and cleaned down to a dull shine. A real shine was achieved with some fine grade wet and dry paper, I wet part of the paper, placed the valve in the drill and rotated until the entire valve had a shine I could see my face in, doing the same with dry wet and dry gives a smooth finish. |
Grinding in the valves is a lengthy but essential part of the process, if you don’t do this you risk burning out the valves, I spent 10 minutes per valve. I oiled the stem and inserted into the guide, I then applied some coarse paste around the base of the valve and rotated anti-clockwise and clockwise to grind the valve in. The valve was then removed and dipped in Petrol, and the seat cleaned with application of petrol to remove deposits of the paste, fine was applied with the same cleanup procedure. This is the stage I am currently at, I have yet to fully reassemble the head and have four more valves to locate.

| As you can see from the image opposite, the valves had all taken some punishment from the collision they had with the cylinders, all had to be replaced. The head is now back on the car and the following steps were taken to get it back on. Once the valves are tickled in, get the spring in, and compress it down, using a screwdriver with some grease on the tip, place a collet on the end and carefully locate it into the valve stem top. Repeat the process with the other collet, using the first screwdriver as a wedge to stop the first collet from coming away. Loosen the compressor off slowly and repeat the process for the other 15 valves! replace the tappets into the head. Now turn to the block, turn the engine so 1 and 4 piston are at the top of their stroke, using a cloth, and some petrol, clean off the carbon, leaving a small ring round the outside of the piston, bear in mind a lot of rags will need to be pushed down the bores in order to clean the oil out. |
Turn the engine so two and three are at the top of their stroke, and repeat the process, clean any excess carbon and align the engine mid way up the stroke, lock off the crank via the locking pin hole in the gearbox bellhousing. Place the gasket on the engine, and locate the head, place each bolt in and hand tighten slightly, following the manufacturers recommended torque settings, torque the head up, replace the cam shafts, and cam bearing carriers, torque these down according to specs. Align the cam pulleys and using the belt, wrap round the bottom pulley, then the exhaust, and then the inlet, and round the waterpump, I found that if you keep the belt taught at all points in the process, the cams should stay inline and not slip. Tighten the tensioner, refit the loom and you should be there. The car won’t start first time and may take a couple of cranks in order to get it started.
| Problems Encountered In getting the car back together I had some major problems with getting it to run smoothly, the loom for the engine bay had been cut about on one to many occasions, also oil and water had combined to damage many of the loom connectors. Now the engine loom as a complete unit is very easy to remove as it is separate from the mail loom, it draws it’s power supply from the fuse box, via a fusible link, disconnecting this, and all the sensors, plus the engine ECU multiplug, will allow the loom to be removed from the car and repaired/ replaced. I choose to repair the loom as I could not find, for love nor money, a loom which was either in tact, or coincided close to the cars VIN. I replaced the Crank angle sensor, and using wiring multiblocks I repaired the previous twisted wire sensor for the Crank angle sensor, I insulated the wiring, put the car back together and she now returns around 35-40MPG which isn’t bad for a car of this size. |
Conclusion
Read up on the procedures first, this is not an easy job, but it is also not a hard one, and with some time and effort put in, and use of quality parts, you can complete a job that will last the course.